If you are interested in existing programs for version control, please read the next section, otherwise, jump to "Project hosting with Google Code".
A little about Version Control Systems program (VCS)
There are two methods for version control:
centralized and
distributed. Basically, in the
centralized method, all the code is hosted on a single sever and all the collaborators need to access the server to download the code, update changes… The benefit is a easy to manage and uniform project. However, every time changes are made, collaborators will need to upload it to the server, and this is inconvenient, especially when the server is down.
The counterpart of centralized technology is
distributed, where code is divided onto local machines of developers. Here, they will update small changes on their own storage, called a "repository". After all changes and verified to work, developers will push all those changes onto the server. This help to keep the server updated with important changes, instead of being overloaded with small fries. Also, developer don't need internet access all the time to work.
To visualize it, you can think of the centralized technology as a single warehouse, where all developers are salesmen that only come in to take / deposit goods as they required. And these salesmen don't actually possess any goods.
Distributed system, on the other hand is a franchise. The central warehouse will distribute / receive goods from stores, which also have their own storages. The central will not care whatever the stores do, as long as the goods are sold.
In reality, software like
SVN falls under the category of centralized version control, while
Git and
Mercurial falls under the distributed category.
Now, let's move on to hosting your project with Google.
Project hosting with Google Code
Google provide an open source environment to host your project. You will need a Google Account to create a 2GB hosting repository for you project. Also, you can join other existing projects as well.
While you can search for existing open source projects to join
here, I will focus on creating a new project and usage of Mercurial Hg (for Windows).
The reason this guide is made is while learning to use Mercurial, I found out that the guide book "
Mercurial: The Definitive Guide" is a bit overwhelmed for first time user, in my opinion, that is, those who have never heard of the term version control before, it's very demotivating. Also, after a few hours searching, I only found guides with for the command shell Mercurial, not the GUI version of Mercurial Hg, which is much more intuitive to use.
Not to delay you anymore, we will now create a project on Google Code by visiting this link:
http://code.google.com/hosting/createProject
(note, please click on the images for a larger preview)
You will need to fill in the project name, summary and description. Your version control system should be Mercurial. About the license, you may choose depend on your purpose (you can refer
here). In case you don't know what to choose, then go for "GNU General Public License v2". Also, add in some labels to indentify your project. Click "Create project".
After finished, you will see your homepage like this. Congrats, now you have a repository for your own ^^.
Next step is created a clone of your repository. Basically, one or many clones will be allocated to a developers and he will be coding on that clones. After some iterations and verification, the (supposedly) satisfied developer will push his changes on to the main repository.
To create a clone, from the homepage, go the the "Source" tabs, then "Clones" and "Create a clone".
You will be prompted for information about this clone. By default, your Google account's name is associated with the clones.
Enter the details and click "Create repository clone". Again, you will see a familiar interface.
There is a couple of things to explore here:
- "Source – Checkout" will give information to setup the local repository on your computer.

- "Source – Browse" provides you with a list of files and directories currently inside your clone.
- "Source – Changes" gives a visual overview of the changes you made. If you are the only developer, all the version goes in a straight line. However, if there are multiples developers involved, most of the times the code will be going in different branches.
- "Source – Clones" list all the clones you have. I hope it should be simple enough to understand :P
Now, with the server setup, you will need to download Mercurial Hg for Windows at http://mercurial.selenic.com/downloads/
Follow the instruction to install it and restart your machine. Now you are ready.
Go to where you want to create your repository clones. After that, right-click and select "TortoiseHg -> Clone…"
Go back to Google code. Under the link Checkout of the clone you have just created, you will see a command, something like "hg clone [project url] [clone name]". Copy the project url and clone name to the source properties of the clone dialog
Finally, click Clone and you have now have a the codes on your hard drive. Of couse, at the moment, it is empty since we haven't added anything to it. But we will.
 |
| Add caption |
On your hard drive, you should see another folder appearing. Go inside it and add all the code files you want. For me, to test out, I just add some random .txt and .c files.
Go back out to the folder, right-click on your clone and choose "Hg Commit". This will create a revision of your code on the hard drive for you to roll back and revise later. However, keep in mind that by committing, you only make LOCAL changes. The server clone is not updated.
After debugging (what we always do :P) and improve your code's readability, to ensure the quality, you can upload it to the server via an action called "push".
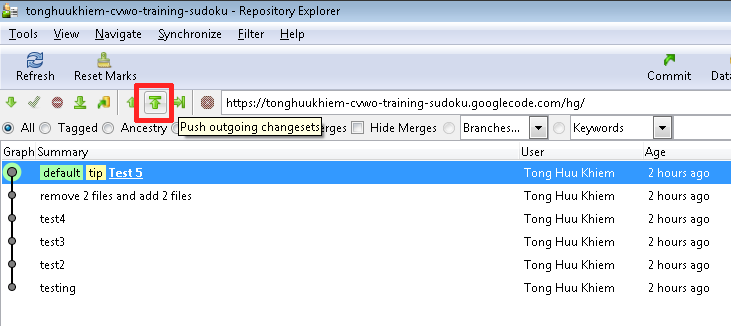
To do so, right-click on your local clone and choose "TortoiseHg -> Repository Explorer". Inside, find the Push icon and click it. You will then be prompted for username and password. The username is you Google Account username, while password is a generated string that you can find in your clones' Checkout tab. (There is a link of "googlecode.com password" inside).
That's it. Now, if you check your clone, you will see that the files are updated.
There are a few things you can also do: if you want to revert to the previous version of the code, in the Repository Explorer, choose that revision and right-click, choose "Revert". Confirm with Mercurial again and you are back to where you start. The beautiful thing is that after you have committed, you can always go back to that revision again.
In addition, say another user updated the directory clone, you will need to update his code. You will need to perform a Pull operation (the opposite of Push, as expected) in the Repository Explorer. The command is in the same toolbar as push, so I will not be including it here.
And now you can do version control :P It is really useful, since even for my 2nd year project in a semester, our group updated like 700+ revision of code. Imagine how hard it would be to manage those.
More reading will be available at inside the "Mercurial: The Definite Guide". I hope that the intro here is good enough for you to go on, read and understand the book. It lacks the GUI help, but the explanations are good, so, you just need to figure out where to execute that command in GUI J
Thank you for reading and see you next time J